This is part 6 of 6 of a mini-series of posts that discuss how to manipulate many images at once (instead of individually) using a variety of techniques. Please refer to part 1 of 6 for more information.
This post explores how to batch process images with Python using OpenCV and NumPy. We will resize and apply the sepia tone effect to a group of photos. For resizing, each image is scaled to three (3) different sizes, 75%, 50%, 25%, of the original. The sepia tone effect is achieved with image desaturation and blending using the algorithm discussed in the introductory post.
All code on this page was developed with & tested against Python 3.5 and NumPy 1.10.4.
Batch Processing with Python Using OpenCV
Batch processing is accomplished by creating a function to select the jpg image files in an input directory, transforming each input image and saving the results to an output directory.
For resizing, each input image is scaled 75%, 50% and 25%, and the three (3) output files are saved. When the sepia tone effect is applied, the result is saved to the specified output directory.
We will be using OpenCV and NumPy. NumPy supports matrix manipulations and does the heavy math when creating soft light blending.
Resizing Images
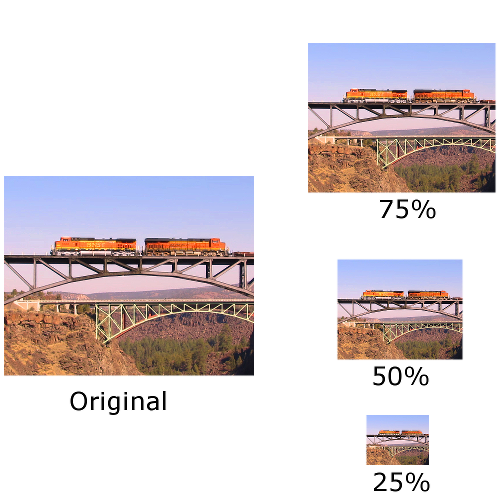
We will resize images based on size percentage of the original image and not only that, but we will create three different sizes (75%, 50%, 25%) as well.
 Original Image Scaled to 75%, 50% and 25%
Resizing One Image to Several Sizes
The following Python code snippet scales an input image into three (3) different sizes, 75%, 50% & 25%, and saves them into the output directory. This can be tested by saving the full script and changing the batchInputImageDir and batchOutputImageDir to valid input & output directories on your system.
resizePercentages = [75, 50, 25]    # Percentages to by which to resize input images

# Resize image by given percentages
for resizePercentage in resizePercentages:

    batchOutImageFN = os.path.join(batchOutputImageDir, imageName + "_" + str(resizePercentage) + ".jpg")
    ResizeImageByPercentAndSave(img, resizePercentage, batchOutImageFN)


# *****
# ResizeImageByPercentAndSave
#
# Description: Resizes image by specified percentage and saves the result
#
# Parameters:
#    inImage : An OpenCV image
#    inResizePercentage : Percentage by which to resize image as a non negative integer
#    inResizedImageFN : Output path and file name where the result is saved
# *****
def ResizeImageByPercentAndSave(inImage, inResizePercentage, inResizedImageFN):

    resizeFraction = inResizePercentage / 100

    imgResize = cv2.resize(inImage, (0,0), fx=resizeFraction, fy=resizeFraction)

    cv2.imwrite(inResizedImageFN,imgResize)
Resizing Multiple Images to Several Sizes
To resize multiple images at once, we include a function to find & process all jpg image files in the input directory as illustrated in the code snippet below. This can be tested by saving the full script and changing the batchInputImageDir and batchOutputImageDir to valid input & output directories on your system.
batchInputImageDir = os.path.join("..","images","in")       # Input directory where jpg files reside
batchOutputImageDir = os.path.join("..","images","out")     # Output directory where results are saves as jpg image files
resizePercentages = [75, 50, 25]    # Percentages to by which to resize input images

# Iterate through all jpgs in the input directory
for jpgFile in os.listdir(batchInputImageDir):

    if jpgFile.endswith(".jpg"):    # Process jpg files only

        # Determine full path and filename
        imageName, imageExt = os.path.splitext(jpgFile)
        batchInImageFN = os.path.join(batchInputImageDir, jpgFile)

        print("Currently processing image: " + batchInImageFN)

        # Open the input image to process
        img = cv2.imread(batchInImageFN)

        # Resize image by given percentages
        for resizePercentage in resizePercentages:

            batchOutImageFN = os.path.join(batchOutputImageDir, imageName + "_" + str(resizePercentage) + ".jpg")
            ResizeImageByPercentAndSave(img, resizePercentage, batchOutImageFN)
Applying the Sepia Tone Effect
Applying the sepia tone effect to an image will give it an old, antique-ish photograph look. As a recap of the discussion of what the sepia tone effect algorithm entails, here is a list of steps to achieve it:
- Desaturate the image. The resulting image is greyscale.
- Apply a mild gaussian blur since most old photos are slightly blurry.
- Add a reddish brown (or dark orange) solid color layer above the photo layer, using the soft light blend mode.
 Sepia Tone Effect Applied to Original Image
We will be implementing the soft light blending mode using the W3C equations which specify the functions f(bottom image, top image) and g(bottom image), where the bottom image is the desaturated & blurred original image and the top image is the reddish brown color filled image.
For more information regarding the sepia tone effect algorithm, please refer to the introductory post.
Applying the Sepia Tone Effect to One Image
The following Python code snippet applies the sepia tone effect to an input image. All matrix math for soft light blending is through NumPy which is much faster and efficient than if we used a bunch of for loops. Other image manipulations use OpenCV. Please note that OpenCV expects RGB (red, blue, green) tuples in reversed order (BGR).
This can be tested by saving the full script and changing the batchInputImageDir and batchOutputImageDir to valid input & output directories on your system.
# Apply the sepia tone effect
batchOutImageFN = os.path.join(batchOutputImageDir, imageName + "_sepia.jpg")
SepiaToneEffectAndSave(img, batchOutImageFN)


# *****
# SepiaToneEffectAndSave
#
# Description: Applies sepia tone effect to input image and saves the result
#
# Parameters:
#    inImage : An OpenCV image
#    inSepiaImageFN : Output path and file name where the result is saved
# *****
def SepiaToneEffectAndSave(inImage, inSepiaImageFN):

    # Desaturate (but needs to be RGB for later operations)
    imgGrey = cv2.cvtColor(inImage,cv2.COLOR_BGR2GRAY)
    imgGrey = cv2.cvtColor(imgGrey,cv2.COLOR_GRAY2RGB)  # Need RGB for matrix math

    # Apply a slight blur
    imgSmooth = cv2.GaussianBlur(imgGrey,(5,5),0)

    # Blend the sepia tone color with the greyscale layer using soft light
    imgWidth, imgHeight, imgChannels = imgGrey.shape
    imgSepiaColor = np.zeros((imgWidth,imgHeight,3), np.uint8)
    imgSepiaColor[:,:] = (42,89,226)  # BGR

    imgSepia = SoftLight(imgSepiaColor, imgSmooth)

    cv2.imwrite(inSepiaImageFN,imgSepia)


# *****
# SoftLight
#
# Description: Implements the soft light blending mode as per w3c
# https://en.wikipedia.org/wiki/Blend_modes#Soft_Light
#
# Parameters:
#    inTopImg : Open OpenCV image (top)
#    inBottomImg : Open OpenCV image (bottom)
# *****
def SoftLight(inTopImg,inBottomImg):

    # Normalize color values to between 0 and 1
    topImgArray = np.asarray(inTopImg) / 255.0
    bottomImgArray = np.asarray(inBottomImg) / 255.0

    softLightImgArray = SoftLightF(topImgArray, bottomImgArray)

    # Convert colors back to between 0 to 255
    softLightImgArray = softLightImgArray * 255.0

    return softLightImgArray


# *****
# SoftLightF
#
# Description: Implements f(bottom image, top image) portion of w3c soft light blending equation
#
# Parameters:
#    inTopImgArray : Top image as array
#    inBottomImgArray : Bottom image as array
# *****
def SoftLightF(inTopImgArray,inBottomImgArray):

    softLightFArray = np.where(inTopImgArray <= 0.5,inBottomImgArray - ((1 - (2 * inTopImgArray)) * inBottomImgArray * (1 - inBottomImgArray)),inBottomImgArray + (2 * inTopImgArray - 1) * (SoftLightG(inBottomImgArray) - inBottomImgArray))

    return softLightFArray


# *****
# SoftLightG
#
# Description: Implements f(bottom image) portion of w3c soft light blending equation
#
# Parameters:
#    inBottomImgArray : Bottom image as array
# *****
def SoftLightG(inBottomImgArray):

    softLightGArray = np.where(inBottomImgArray <= 0.25, ((16 * inBottomImgArray - 12) * inBottomImgArray + 4) * inBottomImgArray, np.sqrt(inBottomImgArray))

    return softLightGArray
Apply the Sepia Tone Effect to Multiple Images
To apply the sepia tone effect to multiple images at once, we include a function to find & process all jpg image files in the input directory as illustrated in the code snippet below. This can be tested by saving the full script and changing the batchInputImageDir and batchOutputImageDir to valid input & output directories on your system.
batchInputImageDir = os.path.join("..","images","in")       # Input directory where jpg files reside
batchOutputImageDir = os.path.join("..","images","out")     # Output directory where results are saves as jpg image files
resizePercentages = [75, 50, 25]    # Percentages to by which to resize input images

# Iterate through all jpgs in the input directory
for jpgFile in os.listdir(batchInputImageDir):

    if jpgFile.endswith(".jpg"):    # Process jpg files only

        # Determine full path and filename
        imageName, imageExt = os.path.splitext(jpgFile)
        batchInImageFN = os.path.join(batchInputImageDir, jpgFile)

        print("Currently processing image: " + batchInImageFN)

        # Open the input image to process
        img = cv2.imread(batchInImageFN)

        # Apply the sepia tone effect
        batchOutImageFN = os.path.join(batchOutputImageDir, imageName + "_sepia.jpg")
        SepiaToneEffectAndSave(img, batchOutImageFN)
Closing Thoughts
Our mini-series exploring image batch processing wraps up with this post. Hope you enjoyed it!
Coming Up …
More image processing fun!
Further Reading
- OpenCV website
- NumPy website
- Blend modes